Learn about our OAuth 2.0 authorization grant flow for API authentication in Aurora.
Khoros supports OAuth 2.0 to authenticate calls from a client application to the Khoros Community. The community supports an authorization grant flow with implicit consent. You can find complete OAuth documentation on the OAuth website.
Note: The OAuth 2.0 grant flow assumes that users will be authenticated in the Community Web UI (via Lithium Registration, LithiumSSO, or SAML 2.0) and that a web browser plays a part in the flow. See "Using the authorization grant flow via a back-end API call" later in this guide for a workaround for using the grant flow with a back-end API call. To make a fully-automated server-to-server API call, do not use OAuth; authenticate with a session key or SSO token instead.
Important: Contact support to add your community domain to the allowed domain list for the Authorization flow.
Before you begin
Before you get started, be sure you understand the following terminology and know how to obtain the credentials you’ll need during the OAuth flow.
Terminology
First, let's define a few terms:
- User Agent – Software that acts on behalf of a user. It is an application remotely accessing a different computer, usually a server, through a network. For example, your browser is a user agent that enables you to send an email from a Gmail account or find a book on Amazon.
- Authorization Service – A service that issues access tokens. An access token is issued upon the first successful user authentication. The token is passed with subsequent REST API calls so a user can make the calls without requiring additional sign-ins. The Authorization Service can also issue refresh tokens. You will not interface with the Authorization Service directly.
- Khoros Community – A Community app hosted by Khoros. This is the entity in the OAuth flow that is responsible for permission control and enforcement.
Find your client ID and client secret
A client ID and secret are used as authorization credentials in the OAuth flow to retrieve the access and refresh tokens that allow the community member in session to make REST calls with the Community API.
- The client ID is used for both anonymous and authenticated calls.
- The client secret is used only for authenticated calls.
About the authorization grant flow
Let's look at a summary of the flow.
-
A user must explicitly sign in to your Community app once to get an authorization code enabling them to get an OAuth access token. This Web UI authentication can happen using a Community-hosted sign-in page or SSO (LithiumSSO/SAML 2.0).
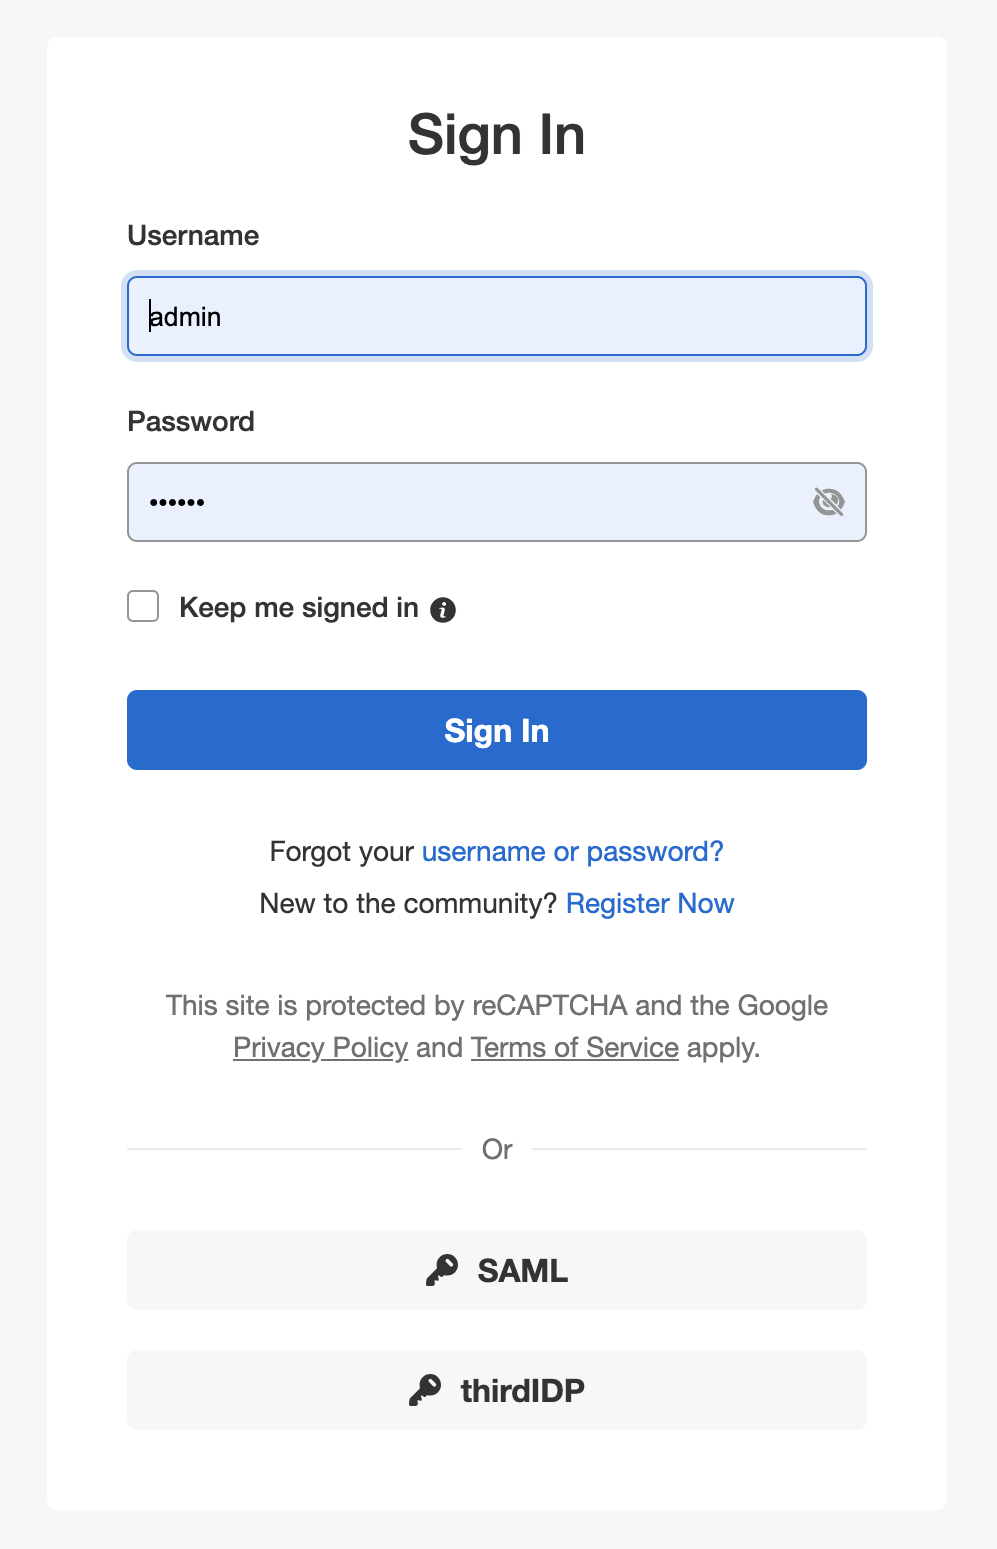
- If Community is configured to use Lithium Registration (a Community-hosted sign-in page), Community opens a Sign In page for users to enter their login and password. Upon successful Community Web UI authentication, the user is redirected to the URL in the ‘redirect URI’ configured when you create the API app in Community Admin > Dev Tools.
- Community returns an authorization code (
code) as a parameter on a redirect URI to the OAuth client on your client application using a backend call. - If your Community uses SSO, you’ll make a POST call to
/auth/authorizepassing the SSO token in the payload. Upon successful SSO authentication, Community returns an authorization code in the response body to your client application using a backend call.
-
Make a server-to-server POST call to
/auth/accessTokenfrom your OAuth client to the Community to get an access token and refresh token mapped to the authorized user. -
Make subsequent Community REST API calls as that user, passing the access token in the header. The access token inherits permissions of the Community app user based on the roles/permissions granted in Community Admin.
-
The access token is valid for an hour. Refresh the access token before the access token expires. The refresh token does not expire unless it is specifically revoked. Once the refresh token is passed, the user will not have to log in again.
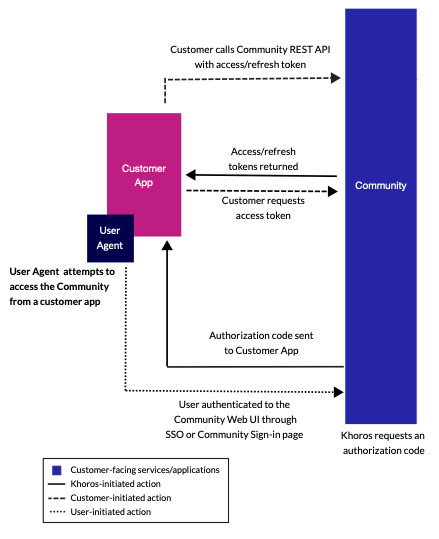
This diagram provides a high-level overview of the authorization grant flow. The flow begins with the User Agent attempting to access Community from a Customer App. Notice that the Community is the only piece of the Khoros platform that the Customer App interfaces with directly. The Authorization Service is transparent to the Customer App.
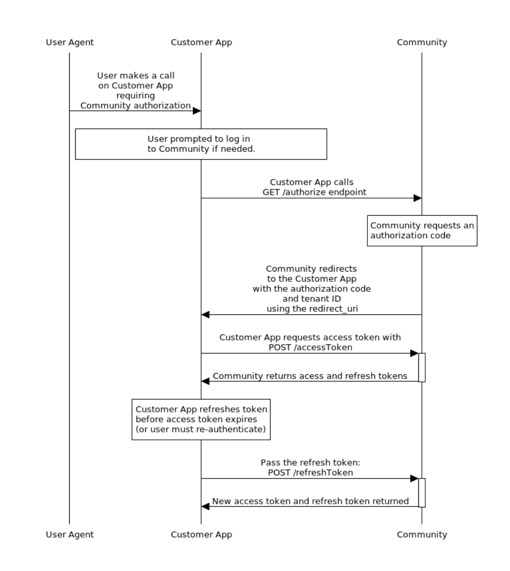
The following diagram provides a more technical description.
Lithium Registration flow
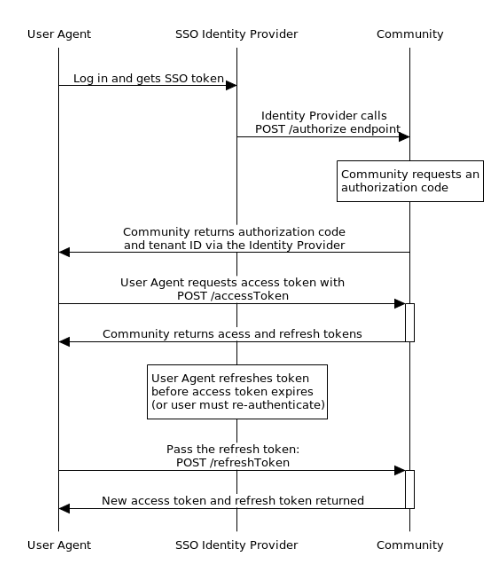
SSO Flow
Using the authorization grant flow via a back-end API call
Note: To make a fully-automated server-to-server API call, do not use OAuth; authenticate with a session key or SSO token instead.
The authorization grant flow assumes that a web browser is involved during authentication. If you want to use a back-end API call for OAuth, create an API-only user with appropriate permissions to make the API calls. Manually initiate the authorization grant flow and log in to the community (using any HTTP client) once for the API-only user following the authorization flow illustrated in the previous diagram. In the last step of the flow, you request and access, and refresh tokens. Store the tokens in your application to use for subsequent authenticated, backend API calls. Use the access token once and then use the refresh token after the access token expires. Using the refresh token ensures that no future logins are required unless the tokens are revoked.
API Application for Authorization Grant Flow
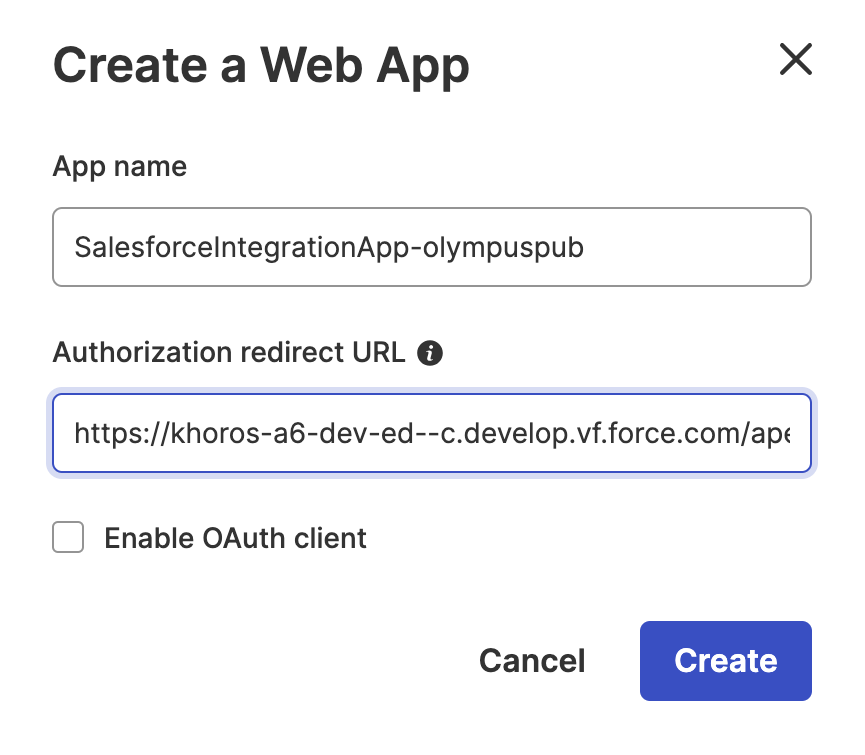
To use and integrate the Authorization Grant Flow, you must create and register the API application in your Aurora community. For example, we use the Salesforce Integration Application.
- Log in to your Aurora Community.
- Go to Account > Dev Tools > Create App.
-
- After the SalesforceIntegrationApp-olympuspub API application is created, you can find the client ID and Client Secret in the API Apps section of the Dev Tools.
- You can authorize your community either using recommended flow or Khoros SSO flow.
OAuth security considerations
OAuth tokens are scoped to a single client application (also referred to as a client ID). A call with a token specific to one client ID will fail if used with a different client ID. The authorization granted with this flow is granted with implicit consent. Client applications can be deleted in Community Admin > Dev Tools if needed.
OAuth API index
- Request authorization (GET /auth/oauth2/authorize) – Recommended Authorization Flow – This flow involves a browser for user authentication.
- Request authorization (POST /api/2.1/auth/authorize) – Khoros SSO flow – Backend API
- Request access and request tokens (POST /api/2.1/auth/accessToken)
- Refresh the access token (POST /api/2.1/auth/refreshToken)
- Validate the access token (GET /api/2.1/auth/validateToken)
- Invalidate the access token (POST /api/2.1/auth/invalidateToken)
Request authorization
If a community user attempts to access the community, the user must be authenticated in the Community Web UI.
Do this once per user.
- If your community is configured for user authorization grant flow, the user is redirected to the community home page for authentication. After a successful authentication, it directs to a redirect URL configured in the API Apps along with the auth code.
- If your community is configured for Khoros SSO, the user goes through the Khoros SSO flow. You will pass the SSO token to POST /api/2.1/auth/authorize.
Request authorization (User Authorization Grant Flow – Involves Browser)
- Make a GET call to
https://[YOUR COMMUNITY DOMAIN]/auth/oauth2/authorizewith the following query parameters:
| Field | Description |
|---|---|
| client_id | The client-id created in your API application. |
| response_type | The value is code. It represents the authorization code. |
| redirect_uri | The redirect URL where the control should be returned after authenticating with the tenant in case of login. The redirect_uri must match the callback URL defined in your Web App registration in Community Admin > Dev Tools. |
| state | A randomly generated string. This is used to mitigate cross-site request forgery. This will be returned as-is in the redirect URL after successful login. How you generate the string is up to you. The allowed length for state is limited by the limitations present in an HTTP GET URL.This field will also function as a CSRF token. Use the state parameter to look up and restore the previous state (before login) of your application. Your application generates a random string and sends it to the authorization server. The authorization server returns the state parameter. If both state values match, all is ok. If the state values differ, someone else has initiated the request. |
Example GET /authorize request
https://[YOUR-COMMUNITY-DOMAIN]/auth/oauth2/authorize?client_id=CLIENT_ID&redirect_uri=REDIRECT_URI&response_type=- When you make the authorization request, a screen prompts the user to approve the application's request to access the account.
-
After you click the Authorize button, you will be redirected to your community login page. You must enter your credentials to log in to the community.
-
Once the community authenticates the user, the browser will provide the redirected URL with authorization code, tenant ID, user ID, and, optionally, state.
https://khoros-a6-dev-ed--c.develop.vf.force.com/apex/LTI_CustomSetting_vfp?code=yn7EqS0RgMO%2BXEYDm%2BauiTUgShBGkHVDqAqew6Vg5Wc%3D&tenant-id=olympuspub&user-id=1&state=dKxkguYxm0U8Tsw3P7gxlH1Zfr11zSSLbNF6iFk - Use the above authorization code to generate the access token.

Request authorization (Khoros SSO flow)
Make a POST call to /api/2.1/auth/authorize, passing the following in the payload.
| Field | Description |
|---|---|
| client_id | The client-id for the community |
| ssoToken | The user’s SSO token. |
| redirect_uri | The redirect URL where the control should be returned after authenticating with the tenant in case of login. The redirect_uri must match the callback URL defined in your Web App registration in Community Admin > Dev Tools. |
| state | A randomly generated string. This is used to mitigate cross-site request forgery. This will be returned as-is in the redirect URL after successful login. How you generate the string is up to you. The allowed length for state is limited by the limitations present in an HTTP GET URL.Use the state parameter to look up and restore the previous state (before login) of your application. Your application generates a random string and sends it to the authorization server. The authorization server returns the state parameter. If both state values match, all is ok. If the state values differ, someone else has initiated the request. |
Example POST /authorize request
curl -X POST \
  https://mycommunity.lithium.com/api/2.1/auth/authorize \
  -H 'Content-Type: application/json' \
  -d '{
  "ssoToken":"[SSO_TOKEN}",
        "clientID":"[CLIENT ID]",
        "redirectUri":"[REDIRECT URI]",
        "state":"[RANDOMLY-GENERATED STRING]"
      }'
The response will contain the authorization code.
Example Response
{
  "status":"success",
  "message":"",
  "data":{
    "code":"XMvE+YIZAt/hr0Lde6ZQtgioAicuUQtQ8pU7w0zVLPI=",
    "user-id":"50355515",
    "state":"state-1",
  }
}
Request access and refresh tokens
POST /auth/accessToken
To get an access token, make a POST call to /auth/accessToken.
The /auth/accessToken endpoint returns an access token and a refresh token that can be passed to /auth/refreshToken (used to refresh a user's access token before the 24 hour expiration period completes).
Header Parameters
| Header Parameter | Description |
|---|---|
| client-id | The client ID generated in Community Admin > Dev Tools |
| Content-type | application/json |
Body Parameters
| Body Parameter | Description |
|---|---|
| client_id | The application's ID |
| client_secret | The application's secret |
| code | The authorization code received from the authorization server. The code is returned from the call to the /authorize endpoint is URL encoded. Before calling the /accessToken endpoint, be sure to decode the code value. |
| grant_type | Always authorization_code |
| redirect_uri | The redirect_uri used in the authorization request. This URI must match the callback URL defined for the community. |
Example POST /auth/accessToken request
curl -X POST \
    https://[COMMUNITY DOMAIN]/api/2.1/auth/accessToken \
    -H "Content-Type: application/json" \
    -H "client-id: [CLIENT ID]" \
    -d '{
            "client_id":"[CLIENT ID]",
            "client_secret":"[CLIENT SECRET]",
            "grant_type":"authorization_code",
            "redirect_uri":"[REDIRECT URI]",
            "code":"[AUTHORIZATION CODE]"
         }'
Example POST /auth/accessToken response
{
    "response": {
        "status": "success",
        "message": "OK",
        "http_code": 200,
        "data": {
            "access_token": "o5IV0yIiNDj/5lNJ6doJh08LX6SsDwtkDXDVmhGvRtI=",
            "expires_in": 86400,
            "lithium_user_id": "2d8c95ed-21dc-4ba6-ab9f-d3eff9c928ce",
            "refresh_token": "XAAWIWKr38W33SlqYooR9OEJW0um9DoyB/o843rdIxk=",
            "token_type": "bearer"
        }
    }
}
Pass the access token with your REST call
When you have your access and refresh token, you are ready to make authorized REST calls to the Community API. Include the authorization token in your request header. All requests should be made over HTTPS. Remember that while the token enables the user to make a Community API call, the permissions applied to the user account in session will determine whether or not the call will be successful.
For instructions for building a Community API v2 URL see Getting Started. For instructions for building a Community API v1 URL, see The API Call.
Before making calls to a third-party application, register the domain from which you will make the calls by filing a Support ticket .
Header Parameters
| Header Parameter | Description |
|---|---|
| client-id | The client ID generated in Community Admin > Dev Tools |
| Content-type | application/json |
| Authorization | Bearer token where token is the OAuth token obtained on behalf of the user |
This example call creates a message on the community.
Example Community API v2 call with access token
curl -X POST \
    https://[COMMUNITY DOMAIN]/api/2.1/messages \
    -H 'content-type: application/json' \
    -H 'Authorization: Bearer [TOKEN]' \
    -H 'client-id: [CLIENT ID]' \
    -d '{
            "data":{
                "type":"message",
                "subject":"This is the message subject",
                "body":"This is a message post.",
                "board":{
                    "id":"myForum"
                }
            }
        }'
Community validates the mandatory client-id and the optional Authorization with the bearer token and routes the call.
Refresh the access token
POST /auth/refreshToken
An access token is valid for an hour before it expires. Refresh the token within that time period with a POST call to /auth/refreshToken and passing the refresh_token received in the response from POST /auth/accessToken. Otherwise, the user will go through the authentication flow again.
When you pass the refresh_token, the Authorization Service issues a new access token and (optionally) a new refresh token. Store the new refresh token in case you need it for subsequent refreshes. The refresh token does not expire.
By default, you'll be issued the same refresh token originally returned from POST /auth/accessToken, however, you can force the authentication service to generate a new refresh token by sending the optional force_refresh parameter.
Header Parameters
| Header Parameter | Description |
|---|---|
| client-id | The client ID generated in Community Admin > Dev Tools |
| Content-type | Always application/json |
Body Parameters
| Body Parameter | Description |
|---|---|
| client_id | The application's ID |
| client_secret | The application's secret |
| refresh_token | The refresh token received from POST /auth/accessToken |
| force_refresh | When true, forces the authentication service to generate a new refresh token and expire the refresh token specified in the refresh_token field passed to the call.When true a new refresh_token is included in the response.Default is false. |
| grant_type | The type of access to grant. Set to refresh_token |
Example POST /auth/refreshToken request
curl -X POST \
    https://[COMMUNITY DOMAIN]/api/2.1/auth/refreshToken \
    -H "Content-Type: application/json" \
    -H "client-id:[CLIENT ID]" \
    -d '{
            "client_id":"CbEwdj3DjslDJLsldk30823480lkaXvNLvA=",
            "client_secret":"BV32987skdjfhSDlkajdhfASDF409234ItWs=",
            "grant_type":"refresh_token",
            "refresh_token":"ZVQaoDdkcsC/9vKZUw0OHEvKG3nd/HoIdwdHLNFwB8E="
        }'
Example POST /auth/refreshToken response
{
    "response":{
        "status":"success",
        "message":"OK",
        "http_code":200,
        "data":{
            "access_token":"o5IV0yIiNDj/5lNJ6doJh08LX6SsDwtkDXDVmhGvRtI=",
            "expires_in":86400,
            "lithiumUserId":"2d8c95ed-21dc-4ba6-ab9f-d3eff9c928ce",
            "refresh_token":"NJIjGeQP3rsdE2Wz46gFExlWdLpwv1kRompX5szrnXY=",
            "token_type":"bearer"
        }
    }
}
Validate the access token
GET /auth/validateToken
If needed, you can validate your OAuth token with /auth/validateToken. Generally, you will not need to perform token validation.
Header Parameters
| Header Parameter | Description |
|---|---|
| client-id | The client ID generated in Community Admin > Dev Tools |
| Authorization | Bearer token where token is the OAuth token obtained on behalf of the user |
Example GET /validateToken request
curl -X GET \
https://[COMMUNITY DOMAIN]/api/2.1/auth/validateToken \
-H 'Authorization: Bearer <access_token>'
Example GET /validateToken response
{
    "status": "success",
    "message": "",
    "data": {
        "valid": true,
        "clientId": "<client-id>",
        "clientSecret": "<client-secret>",
        "lithiumUserUuid": "<user uuid>"
    }
}
Invalidate the access token
POST /auth/invalidateToken
If your token is compromised, you can invalidate it with /auth/invalidateToken. No body is required.
Header Parameters
| Header Parameter | Description |
|---|---|
| client-id | The client ID generated in Community Admin > Dev Tools |
| Authorization | Bearer token where token is the OAuth token obtained on behalf of the user |
Example POST /invalidateToken request
curl -X POST \
https://[COMMUNITY DOMIAN]/api/2.1/auth/invalidateToken \
-H 'Authorization: Bearer <access_token>'
Example POST /invalidateToken response
{
    "status": "success",
    "message": "",
    "data": {}
}
ATLAS
Comments