Learn about the content workflow action, how to enable it, and an example to demonstrate one of the workflow actions.
Released in 23.7
Depending on the size of your company and the roles different people have in creating, engaging and high-quality content, you might have multiple people involved in creating certain assets. For example, you might have a primary writer, several reviewers, and a final approver. With Aurora’s Content Workflow feature, you can set up different roles for each person in the creation and review process and have the content move through the Content Workflow. Content Workflow applies only to Blogs and Knowledge Base (KB) articles.
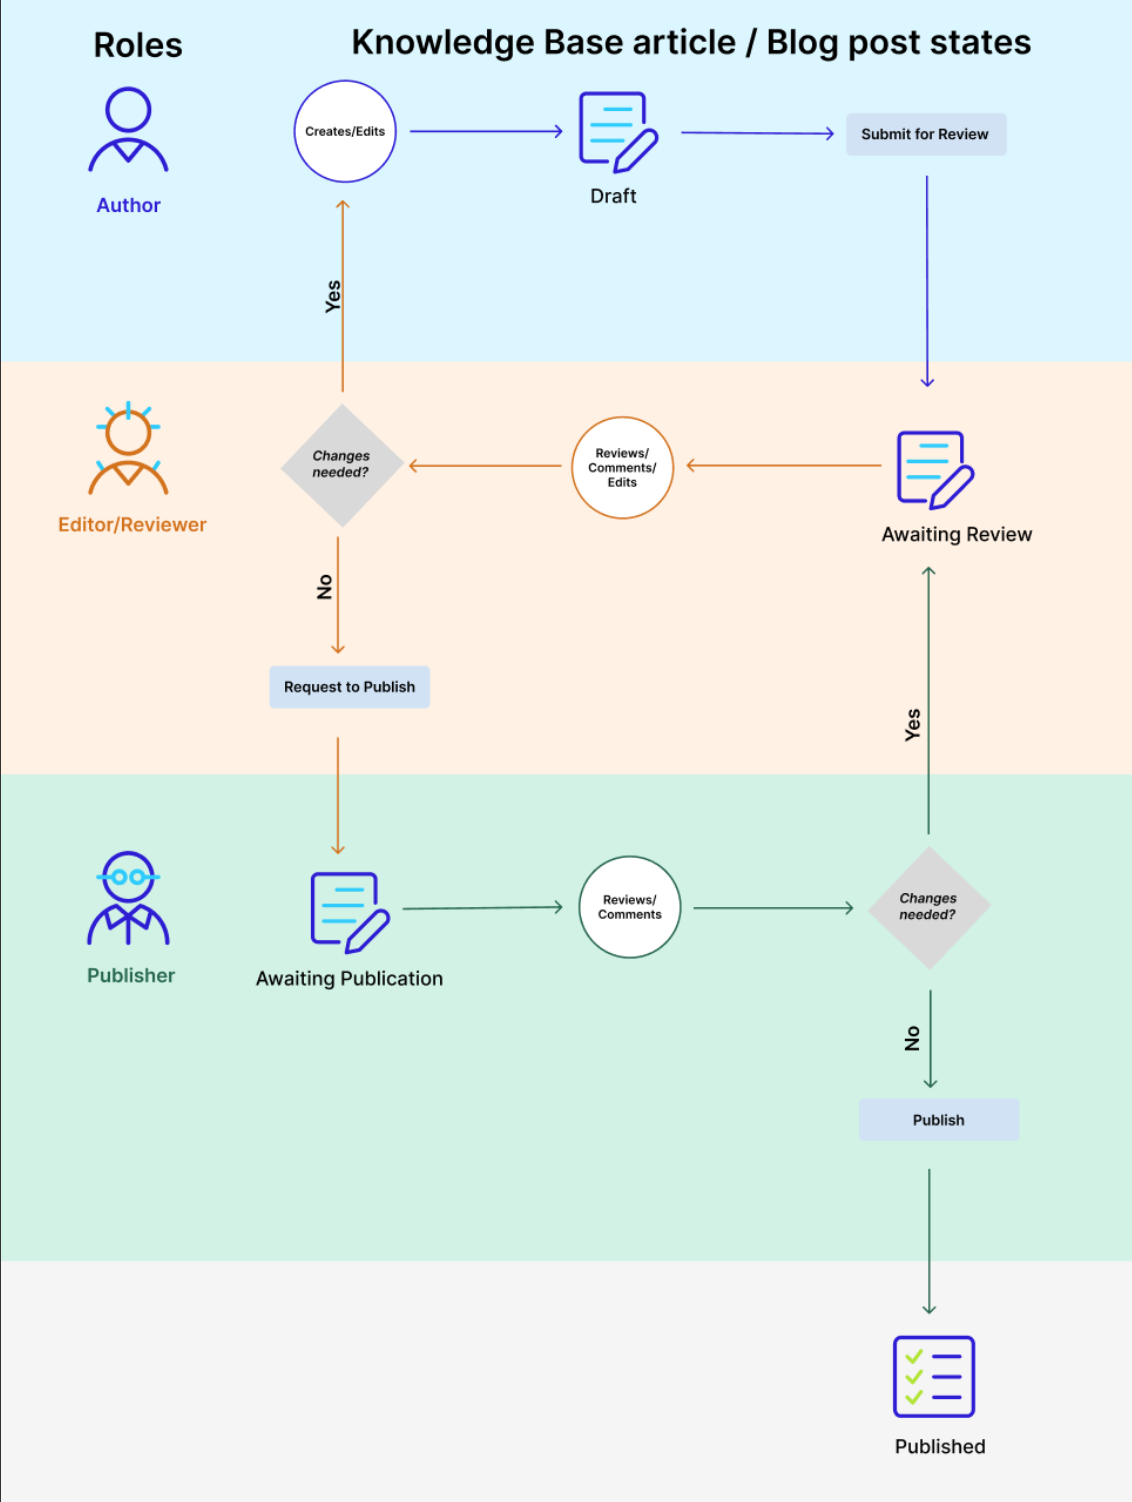
In the Content Workflow process, each blog post and KB article moves through different states, and members with different roles, such as author, editor, and publisher, view the latest state of articles.
This flowchart shows how an article moves through the publishing workflow and the tasks members with specific roles can perform.
Check whether the Content Workflow setting is enabled
Before enabling the Content Workflow setting, you must enable content workflow for the place (node). To check this, use the following GraphQL Query:
{coreNode(id:"category:amy-test-category"){
   cwaProperties{
       cwaEnabled{
           failureReason{
               message
           }
       }
   }
}
}
In the id field, you can pass the category, board, or community based on where you want to implement the content workflow.
Example response:
{
    "data": {
        "coreNode": {
            "cwaProperties": {
                "cwaEnabled": {
                    "failureReason": {
                        "message": "error.lithium.policies.feature.content_workflow.enabled.accessDenied"
                    }
                }
            }
        }
    }
}
The GraphQL response above shows that the CWA setting is turned off. If the setting is turned on, the message displays null.
Enable the Content Workflow Setting
You can enable the CWA for your whole community, category, or board.
In this section, we are going to enable the Content Workflow for a category. You must pass the category id to the nodeId field. You could also enable it across the community by passing the community id or board id.
To turn on the Content Workflow for your community, use the following GraphQL Query:
URL: https://<YOUR COMMUNITY DOMAIN>/api/2.1/graphql?restapi.session_key=<API KEY>
mutation setCWASettingsOnNode($nodeId:ID!, $settingsInput: NodeCWASettingsInput!) {
   setCWASettingsOnNode(nodeId: $nodeId, settingsInput: $settingsInput) {
        result
    }
}
Variables:
{
  "nodeId": "category:amy-test-category",
  "settingsInput": {
      "enabled": true
  }
}
Example response:
{
    "data": {
        "setCWASettingsOnNode": {
            "result": true
        }
    }
}
Roles and Their Actions
The table below describes the state of the article and the associated workflow actions for it in the Content Workflow process.
| State | Role | RECALL | EDIT DRAFT | SUBMIT FOR REVIEW | RETURN TO AUTHOR | SUBMIT FOR PUBLICATION | RETURN FOR REVIEW | PUBLISH | SCHEDULE PUBLICATION |
|---|---|---|---|---|---|---|---|---|---|
| DRAFT | Author Only | Yes | Yes | ||||||
| Editor Only | |||||||||
| Publisher Only | |||||||||
| Author & Editor | Yes | Yes | Yes | ||||||
| Author & Publisher | Yes | Yes | |||||||
| Editor & Publisher | |||||||||
| Author & Editor & Publisher | Yes | Yes | Yes | Yes | |||||
| Awaiting Review | Author Only | Yes | |||||||
| Editor Only | Yes | Yes | Yes | ||||||
| Publisher Only | |||||||||
| Author & Editor | Yes | Yes | Yes | Yes | |||||
| Author & Publisher | Yes | ||||||||
| Editor & Publisher | Yes | Yes | Yes | Yes | Yes | ||||
| Author & Editor & Publisher | Yes | Yes | Yes | Yes | Yes | Yes | |||
| Awaiting Publication | Author Only | Yes | |||||||
| Editor Only | Yes | ||||||||
| Publisher Only | Yes | Yes | Yes | ||||||
| Author & Editor | Yes | ||||||||
| Author & Publisher | Yes | Yes | Yes | Yes | |||||
| Editor & Publisher | Yes | Yes | Yes | Yes | |||||
| Author & Editor & Publisher | Yes | Yes | Yes | Yes | |||||
| Scheduled Publication | Author Only | Yes | |||||||
| Editor Only | Yes | ||||||||
| Publisher Only | Yes | ||||||||
| Author & Editor | Yes | ||||||||
| Author & Publisher | Yes | Yes | |||||||
| Editor & Publisher | Yes | Yes | |||||||
| Author & Editor & Publisher | Yes | Yes |
Schedule an Article for Publication
In this example, we are going to schedule a KB article for publication.
To schedule an article, ensure that the member has the following role:
- KBAuthor
- KBPublisher
Basic Steps
- Log in as a user with a KBAuthor and KBPublisher role.
- Generate the API key using the session key.
- Use the API key and GraphQL query to schedule a blog article for publication.
The article will be published according to the schedule, time, and timezone.
Example
In this example, we are going to create a KB article with the subject “The Martyr’s Curse” and schedule this article for publication on 29th July 2023 at 15 hours.
- Generate the API session by passing your credentials to the URL.
The generated API session key is . - Ensure that the administrator has assigned you the KBAuthor and KBPublisher roles.
- Add the API key as a header in the GraphQL query and run the below create and update tkb Mutation and variables.
- The GraphQL Query for the KB article is given below.
URL:https://<YOUR COMPANY DOMAIN>/api/2.1/graphqlmutation createTkbArticle($createInput: CreateTkbArticleInput!) { createTkbArticle(createInput: $createInput) { result { id subject body board { id creationId creationDate conversationStyle }
ATLAS
Comments