Learn about the Detailed Development flow where you can check-in your customizations to the Github repository.
The Development Flow begins with the creation of the Git repositories that are linked to the customer's current environments.
Developers can work with standard IDE tools and Git commands to perform the following actions:
- Check out the Aurora Software Development Kit (SDK)
- Make and preview their changes locally
- Publish their changes from the Stage to the Production environment
Note about Designer and Backend update
When an administrator uses the Designer to update a page or theme and save it, this save will update the production environment directly so that the developers should synchronize the production settings and themes often as their process.
Single Developer Flow
If you have a single developer working on your project and you would like to make it possible for them to bypass the approval process on pull requests, please contact support and request that they include thesingledevmosaic service in your community's config.
Developer Actions
Within the Development Flow, Developers can perform the following actions:
- Work on multiple development branches at once
- Synchronize Production data to Stage on demand
- Create and update custom components using Handlebars
- Work in different branches and preview their changes without affecting the production
- Preview changes live without a commit or merge
Detailed Development Flow
Khoros provisions multiple Git repositories per customer as part of the Aurora launch process. The number of Git repositories is dependent on the customer's current environments.
As a minimum requirement, there are two repositories:
- Stage
- Production
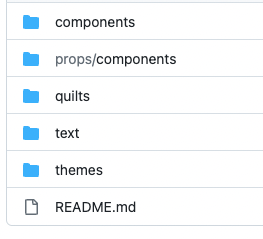
A typical structure of a repository is displayed in the below image.
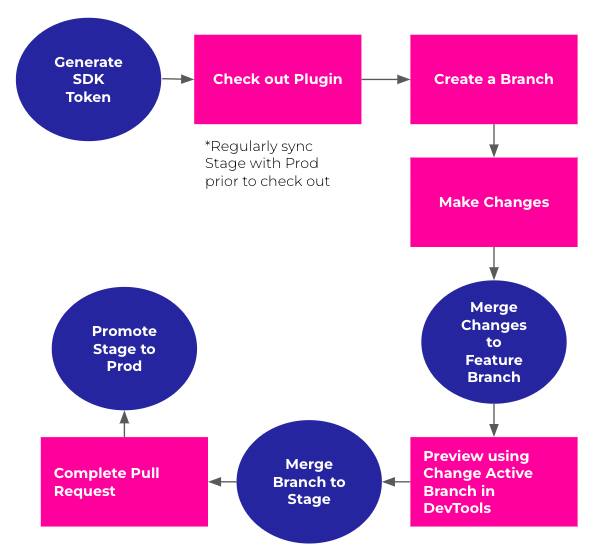
Steps to make changes to a Production Community Site
- Navigate to the desired non-production site.
- Generate an SDK token from the User Account > Dev Tools. An SDK token only needs to be generated once for an environment.
Note
SDK Token can only be generated from a non-production site.
- Check out the plugin.
- Git clone the repository to your local environment. Stage becomes the default branch.
git clone <path of your repository>
- Create a branch using normal git commits to work in branches.
git checkout -b feature/<Your Branch Name>
Note
Developers should branch off Stage and merge the changes to Stage.
The Stage environment should be synchronized with the Production environment and rebased regularly.
- Make necessary changes to the branch. The changes can be done in any place such as components, quilts, themes, and text.
- Run a local command through the SDK to make local branch changes available to preview.
- Go to User Account > Dev Tools and click the Change Active Branch button to preview the branch changes live while navigating the Community. A branch indicator is displayed in the lower left corner.
- Add your changes to the desired branch.
git add
- Commit your changes.
git commit -m "<Your Code>"
- Push your changes.
git push
- Create a pull request and then merge the changes from Stage to the Production environment.
Note
An error message is displayed when a merge is attempted along with a pull request.
- Once your changes are merged, these changes are shown in the Production environment.
Detailed Development Flow Diagram
ATLAS
Comments